Una fantástica api para diseñar online gratis tus fuentes True Type o Pixel Font, tus iconos y pictogramas, compartirlos y descargarlos creada por Rob Meek de FontShop

El interfaz es limpio, usable y claro. Lo primero es nombrar tu fuente, luego vas diseñando cada carácter, por defecto empiezas por A pero abajo tienes todo el set según el alfabeto. En el panel izquierdo tienes las formas (ladrillos) para dibujar en la rejilla donde una guía te indica la línea de base. Un panel flotante de 6 herramientas con las que dibujar, desplazarte y borrar con los iconos de siempre.
El archivo de descarga será un zip con dos txt (licencia Creative Commons y readme) y tu archivo .ttf (True Type) que al haberse creado vectorialmente podrás utilizarlo a cualquier tamaño. Para crear una Pixel Font, para Flash por ejemplo, dibuja sólo con el ladrillo cuadrado y selecciona la previsualización Pixel.
Está aún en beta pero seguro que será todo un éxito, una vez guardada puedes descargarla y compartirla.
Instrucciones en inglés:
Your First FontStruction
Step 1: Choose a Letter
Once you’ve started the FontStructor editor, you first need to choose the letter to start designing. When you start the FontStructor for the first time, the latin letter «˜A»™ will be active. You can see it’s highlighted in the list of characters at the bottom of the screen:

The Character Selector
You can choose a different letter by clicking on a different character, or you can choose a completely different set of characters from the list in the bottom left.
Step 2: Choose a Brick
Now you’ve chosen a character, you need to choose a shape to build with.
On the left-hand side of the screen you will find the «˜All Bricks»™ panel, a collection of shapes – «˜bricks»™ – which are available. By default, a simple square is selected and highlighted:

The «˜All Bricks»™ panel
Step 3: Choose a Tool
Once you»™ve chosen your character, and your brick, you need to choose a drawing tool. There are a number of drawing tools available. When you first start, the pen tool is selected by default in the tool palette:

The Tool Palette
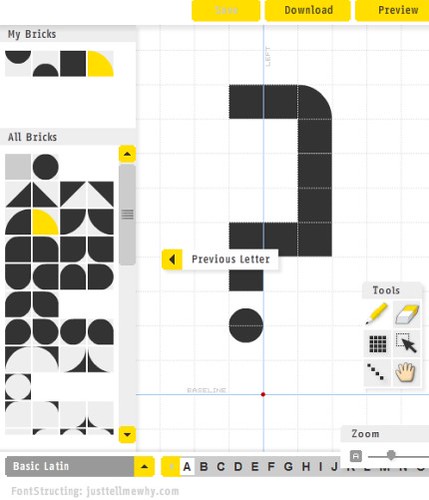
Step 4: Start Drawing your Letter
Now you can start designing by clicking anywhere on the squared canvas.
Note that the horizontal, blue guideline marked «˜BASELINE»™ is the baseline for your letters – so they should usually sit on this line. The vertical, blue guideline marks the left-side of your letters. So most of your letters will probably be built upwards and to the right of the red dot.

The red dot it the origin. Most letters will be built sitting on the horizontal blue baseline.
Congratulations, you»™re FontStructing!

Step 5: Preview, Save, Download
Once you’ve built a few letters, you may want to look at them together, and try typing with them. To do this, click on the «˜Preview»™ button at the top of the screen:

Your view changes to look like this:

In the top half of the screen you can type in any letters you have created. In the bottom half of the screen you can see all your letters. You can use the slider controls to change the size of your letters. Press the «˜Go Back»™ button to return to the editor.
Always remember to save your work regularily, using the «Save» button at the top of the edit screen.
Once you»™ve finished creating your font, click the «˜Download»™ button to download a .zip archive file containing your finished TrueType font file and licensing information.
Try more bricks, try different tools, build more letters, have fun, and don’t forget to save your work. If you do get stuck, return to the help page for more detailed information.
Working with Bricks
Bricks?
Bricks are the 2-dimensional building blocks which you use in FontStruct to build your FontStructions. All the bricks available to you are shown in the «˜All Bricks»™ panel on the left hand side of the FontStructor editor.
My Bricks
Above the «˜All Bricks»™ panel you can see another area of the editor called «˜My Bricks»™:

This area contains all the bricks which are currently used in your FontStruction and has several uses.
Brick Cycling with the Pen Tool
When you click once in an empty grid square with the pen tool, the pen will place the currently selected brick (the yellow one) in the square. If you click again, the next shape in the palette will appear in the square, and so on. After you»™ve reached the last brick in the palette, clicking again with the pen tool will clear the square. After that, the cycle starts again from the beginning with the yellow, selected brick.
Brick cycling with the pen tool can greatly speed up the creation of FontStructions, especially if you are only working with a small set of bricks.

Brick Cycling. With every click, a different brick.
You can also set the active, yellow brick at any time by hitting a number key: «˜1″™ for the first brick, «˜2″™ for the second brick and so on.
Brick Swaps
You»™ve just finished a great FontStruction. A thing of great beauty. But suddenly you realise you»™d rather have dots rather than squares, or rounded corners instead of sharp ones. Do not despair. You don’t have to draw the whole thing again from scratch. You can quickly replace all instances of any brick in «˜My Bricks»™ with a different brick chosen from «˜All Bricks»™. To do this, simply drag a brick from «˜All Bricks»™ into «˜My Bricks»™ and drop it on the brick you wish to replace. Voilí !

Before the swap

Dragging the new brick over the existing one.

The swap is complete, throughout your FontStruction.
The Tools Palette
The FontStructor has six main tools which are selected by clicking on the corresponding icon in the Tools Palette, or by hitting a shortcut key. Such tools may be familiar from other drawing software.
The Pen Tool
![]() The pen is the main drawing tool. Click, or click and drag anywhere on the squared canvas to place bricks in the various squares. Hold down the shift key if you want to switch to the Eraser tool temporarily. Clicking the pen tool repeatedly over a single grid square will cycle through the bricks in the «˜ My Bricks»™ panel (read more)
The pen is the main drawing tool. Click, or click and drag anywhere on the squared canvas to place bricks in the various squares. Hold down the shift key if you want to switch to the Eraser tool temporarily. Clicking the pen tool repeatedly over a single grid square will cycle through the bricks in the «˜ My Bricks»™ panel (read more)
The Eraser Tool
![]() The eraser clears every grid square it is clicked over. You can also drag a box over multiple bricks to clear them all. Hold down the shift key if you want to switch to the Pen tool temporarily.
The eraser clears every grid square it is clicked over. You can also drag a box over multiple bricks to clear them all. Hold down the shift key if you want to switch to the Pen tool temporarily.
The Rectangle Tool
![]() The rectangle tool fills rectangular blocks of grid squares with the currently selected brick. Click and drag on the canvas to do this.
The rectangle tool fills rectangular blocks of grid squares with the currently selected brick. Click and drag on the canvas to do this.
The Select Tool
![]() The select tool can be used to select single or multiple bricks for cut, copy and paste operations, or to drag around the drawing canvas. If you can’t select all the bricks you need with one click, or one click-and-drag, hold down the shift key to add bricks to the current selection. You can also simply drag individual bricks around with this tool.
The select tool can be used to select single or multiple bricks for cut, copy and paste operations, or to drag around the drawing canvas. If you can’t select all the bricks you need with one click, or one click-and-drag, hold down the shift key to add bricks to the current selection. You can also simply drag individual bricks around with this tool.
The Line Tool
![]() Click once on the square at the start of the line, and once more on the end square to draw a line.
Click once on the square at the start of the line, and once more on the end square to draw a line.
The Hand Tool
![]() Click and drag to move the entire canvas around. Whatever tool you currently have selected, holding down the spacebar will switch to the hand tool.
Click and drag to move the entire canvas around. Whatever tool you currently have selected, holding down the spacebar will switch to the hand tool.
You can create many different letters using FontStruct.
In the bottom left of the screen is a menu for choosing the active character set.

Clicking it will reveal a list of all available character sets:

Note that there is no problem in creating a FontStruction containing letters from mutliple character sets. Also you don»™t have to create letters, you could create icons or other kinds of pictograms for example.
Depending on your operating system, not all characters in all characters sets may be displayed properly. The FontStruct team is working to improve this situation.
Tips on Changing Letters
You can use the keyboard to quickly move from letter to letter without having to use your mouse. The left and right arrow keys will move to the previous and next letters in the current character set respectively. To jump directly to a non-adjacent letter, you can use the keyboard combination Shift (or Ctrl in Windows) – L, and then the letter you wish to edit.
Customizing the Interface
The interface of the FontStructor is quite flexible. As you become more experience in using the editor, you may look for additional features or wish to clear the screen of superfluous elements. Here are some tips on customizing the interface.
Panning and Zooming
You can use the zoom slider to make your letters appear bigger or smaller on the screen:

You can also zoom in and out using the «˜ +»™ and «˜ -«™ keys, or by using the wheel on your mouse if you have one.
To pan (move the whole canvas around), you need to use the hand tool, or hold down the spacebar and click and drag anywhere on the squared canvas.
Extra Guides
The «˜BASELINE»™ and «˜LEFT»™ guides are always visible, but sometimes it may be useful to have a couple more, adjustable guidelines, so you can mark the general vertical and horizontal size of your letters. To turn these extra guides on and off, you can use the «˜Advanced»™ menu at the top of the screen as shown.

The two new guides can be dragged and dropped to the desired positions. Font Experts please note that these guides currently have no effect on font metrics.
Minimal Mode
If you really know your keyboard shortcuts, and you don»™t need to add any more bricks, you may well want to switch to minimal mode. In this mode, almost all panels disappear from the screen. No distractions, it»™s just you and the grid. Again this option can be turned on and off from the «˜Advanced»™ menu.
Similarly you can turn off the grid visibility from the same menu, for an even more minimalist experience.
Adjacent Characters
This is an experimental feature which displays adjacent characters from the current character set to the left and right of the current letter. The idea is to assist in creating a coherent, stylistically uniform FontStruction by allowing an ongoing comparison between letters. Expect this feature to be enhanced in the future. It»™s selected from the «˜Advanced»™ menu.
Full Screen Mode
If you don’t like the feeling of working in a browser, choose this option from the «˜Advanced»™ menu. There is a technical limitation however – you cannot use the keyboard in this mode. The only key that does anything is the «˜ESC»™ key which is used to exit full screen mode.
Making Pixel Fonts
Every FontStruction has a scalable vector outline. So you can build fonts that work at any size. But FontStruct is also optimized for the creation of Flash-compatible pixel fonts.
Creating a pixel font with FontStruct is very simple. Just note three things:
1. Use only the default square for drawing.
2. When you download your font, look in the «˜read_me.txt»™ for information on the optimal pixel size for the font in Flash.
3. There»™s a special panel, accessible from the Advanced menu at the top of the screen, called «˜Pixel Preview»™. This will show you the current letter at a brick=pixel resolution:
![]()
Note that this panel, shows 1 black pixel for any brick on the canvas, whatever its shape, so it only provides an accurate preview for square pixels.
Using your pixel font in flash and other software
There are many resources in the internet explaining how best to use pixel fonts, and how to avoid blurring. Do a quick Google search or read this tutorial.
me gustaria saber como hago para adquirir este programa completo de diseño de fuentes…..
hi,you live in london or madrid?
me gustaria del saber como hago adiquirir este prugama en del computer cumpleto?envie del resposta para del orkut acima ok sem demuera estou aguardando ate amana