Está claro que la literatura sobre Photoshop crece a proporciones desorbitadas en la red. Cada vez hay más usuarios más o menos profesionales capaces de mostrarnos sus trucos.
Si además luego haces un grupo en Flickr.com con los resultados puedes añadir a tu tutorial el número de versión 2.0
En concreto este tutorial habla de cómo crear estos círculos en Photoshop, en inglés pero muy facilito, al final tenéis el link al grupo de Flickr:


Make a square selection
1. Open an image in Photoshop (screenshots are from Photoshop CS2 on Mac). Higher resolution and size will give better results. I have used a picture I took myself some time ago. If you want to use the same picture for this How to, you can find it here.
2. You need to make a selection that is squared. Use the selection tool, and set the aspect ratio to fixed:

3. Enter the same number in both fields. 1 and 1 works.

4. Make a selection.

Apply the filter
5. Apply the filter Polar Coordinates:

6. In this step, use the bottom radio button, marked «Polar to Rectangular»:

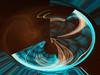
7. Now your image will turn into something that may look interesting at best, but we’re not yet there:

Rotate and apply filter again
8. Rotate the selection 180 degrees. There are a few different ways to do this. One of them is to use the Edit menu, then Transform and Rotate 180 degrees.

9. Now apply the same filter we did in point 5. But do NOT just choose it from the top of the Filter menu. We are going to change one of the parameters so you have to choose it from Filters > Distort > Polar Coordinates again.
This time, choose the upper radio button, labeled «Rectangular to Polar»:

Crop and save
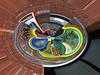
10. Crop your picture to get rid of the stuff surrounding your new Amazing circle:

11. Voila!

Save and upload to Flickr.
12. I have created a group for Amazing circles. Please join!
![]()
Deja una respuesta